LaTex 的文本语法

1. 特殊命令
.1. include & input
引入一个外部文件,使之并成为文章的一部分;如,有两个Tex文件 main.tex 和 chapter1.tex 在同一目录下,只要在 main.tex 中加入 \include{chapter1.tex} 或 \include{chapter1} 即可在相应位置引入 chapter.tex 的所有内容。在引用的时候,不需要加后缀。
- 插入后的换页方式不同
input 内容会
嵌入在调用的位置,与原内容是在同页连续的;而\include 的内容在嵌入会在后面加上一个换页,使其后面的内容重新一页开始。 - 编码原理不同
\input 是在
编译前就插入原文件,形成一个文件再编译; \include 是先单独编译,然后将生成的各自的PDF再进行合并,这也是换页产生的原因。`\input 可以写进Preamble,而\include不可以;,input 可以递归使用,而\include 不可以的。比如有三个文件 a.tex, b.tex, c.tex,如果包含关系是这样的: a(b©),那么编译时会报以下错误:\include cannot be nested. \include{c}。
.2. 定义、定理、引理、证明 设置方法
- \newtheorem{定理环境名}{标题}[主计数器名]
- \newtheorem{theorem}{Theorem}[Chapter]
定义一个以Theorem为标题的theorem环境,计数以章节数为主.
\renewcommand*{\qedsymbol}{[证毕]}
\begin{proof}[证:]
证明正文。
\end{proof}
\begin{thm}[附加标题,如定理名称,作者]
文本
\end{thm}
较短的证明可以用
\begin{proof}[标题]
证明内容。
\end{proof}
2. 基本结构
-
\documentclass{article}表⽰该⽂档的类型是期刊(aiticle),LaTeX 还⽀持report(报 告)、book(书籍)、beamer(幻灯⽚)等多种类型。 -
\begin{document}和\end{document}表⽰⽂档内容的开始和结束,所有正⽂内容都写在其中。 -
\begin{document}前的部分我们称为导⾔区,宏包都是写在导⾔区。
\documentclass{article}
%这是导言区
\begin{document}
\end{document}
.1. 中英混排
\documentclass{article}
\usepackage{xeCJK} %调用 xeCJK 宏包
\setCJKmainfont{SimSun} %设置 CJK 主字体为 SimSun (宋体)
\begin{document}
你好,world!
\end{document}
.2. 作者&标题日期
\documentclass[UTF8]{ctexart}
\title{你好,world!}
\author{Liam}
\date{\today}
\begin{document}
\maketitle
你好,world!
\end{document}
.3. 章节段落
\section{·}\subsection{·}\subsubsection{·}\paragraph{·}\subparagraph{·}
在
report/ctexrep中,还有\chapter{·};在文档类book/ctexbook中,还定义了\part{·}。
\documentclass[UTF8]{ctexart}
\title{你好,world!}
\author{Liam}
\date{\today}
\begin{document}
\maketitle
\section{你好中国}
中国在East Asia.
\subsection{Hello Beijing}
北京是capital of China.
\subsubsection{Hello Dongcheng District}
\paragraph{Tian'anmen Square}
is in the center of Beijing
\subparagraph{Chairman Mao}
is in the center of 天安门广场。
\subsection{Hello 山东}
\paragraph{山东大学} is one of the best university in 山东。
\end{document}
.4. 插入目录
\documentclass[UTF8]{ctexart}
\title{你好,world!}
\author{Liam}
\date{\today}
\begin{document}
\maketitle
\tableofcontents
\section{你好中国}
中国在East Asia.
\subsection{Hello Beijing}
北京是capital of China.
\subsubsection{Hello Dongcheng District}
\paragraph{Tian'anmen Square}
is in the center of Beijing
\subparagraph{Chairman Mao}
is in the center of 天安门广场。
\subsection{Hello 山东}
\paragraph{山东大学} is one of the best university in 山东。
\end{document}
3. 页面设置
.1. 页边距
%将纸张的长度设置为 20cm、宽度设置为 15cm、左边距 1cm、右边距 2cm、上边距 3cm、下边距 4cm
\usepackage{geometry}
\geometry{papersize={20cm,15cm}}
\geometry{left=1cm,right=2cm,top=3cm,bottom=4cm}
.2. 页眉页脚
%在页眉左边写上我的名字,中间写上今天的日期,右边写上我的电话;页脚的正中写上页码;页眉和正文之间有一道宽为 0.4pt 的横线分割
\usepackage{fancyhdr}
\pagestyle{fancy}
\lhead{\author}
\chead{\date}
\rhead{152xxxxxxxx}
\lfoot{}
\cfoot{\thepage}
\rfoot{}
\renewcommand{\headrulewidth}{0.4pt}
\renewcommand{\headwidth}{\textwidth}
\renewcommand{\footrulewidth}{0pt}
.3. 行间距
\usepackage{setspace}
\onehalfspacing
.4. 段间距
\addtolength{\parskip}{.4em}
4. 特殊字符
% 表示注释,$、^、_ 等用于排版数学公式,& 用于排版表格
如果想要输入以上符号,需要使用以下带反斜线的形式输入:
\documentclass[UTF8]{ctexart}
\begin{document}
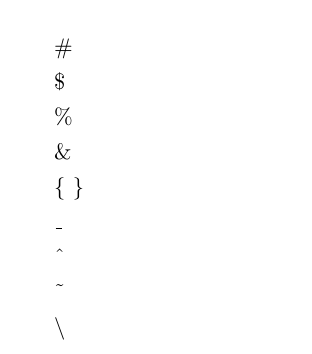
\#
\$
\%
\&
\{ \}
\_
\^{}
\~{}
\textbackslash
\end{document}
注:(1)
\^和\~两个命令是需要带参数的,如果不加一对花括号(空参数),就将后面的字符作为参数,形成重音效果。(2)\\被直接定义成了手动换行的命令,输入反斜杠就只好用\textbackslash
5. 标点符号
LATEX 的单引号 ‘ ’ 用 `和 ’ 输入;双引号 “ ” 用 `` 和 ’’ 输入
\documentclass[UTF8]{ctexart}
\begin{document}
``请关注微信公众号 `钦念博客' 。''
\end{document}

LATEX 中有三种长度的“横线”可用:
-
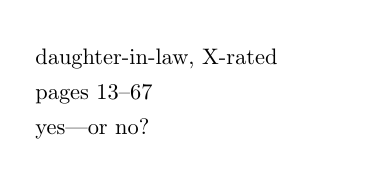
连字号(hyphen):用来组成复合词;
-
短破折号(en-dash):用来连接数字表示范围;
-
长破折号(em-dash):用来连接单词,与中文语境中的破折号类似。
\documentclass[UTF8]{ctexart}
\begin{document}
\noindent
daughter-in-law, X-rated\\
pages 13--67\\
yes---or no?
\end{document}
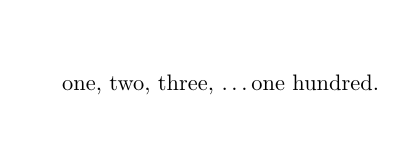
LATEX 提供了命令 \ldots 来生成省略号,相对于直接输入三个点的方式更为合理。\ldots 和 \dots 是两个等效的命令。
\documentclass[UTF8]{ctexart}
\begin{document}
one, two, three, \ldots one hundred.
\end{document}
6. 文字强调
强调文字的方法,要么是添加下划线等装饰物,要么是改变文字的字体。
LATEX 定义了 \underline 命令用来为文字添加下划线:
\documentclass[UTF8]{ctexart}
\begin{document}
An \underline{underlined} text.
\end{document}
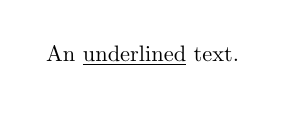
\underline 命令生成下划线的样式比较机械,不同的单词可能生成高低各异的下划线,并且无法换行。ulem 宏包解决了这一问题,它提供的 \uline 命令能够轻松生成自动换行的下划线。
另外,\emph 命令用来将文字变为斜体以示强调。如果在本身已经用 \emph 命令强调的文字内部嵌套使用 \emph 命令,内部则使用直立体文字。
\documentclass[UTF8]{ctexart}
\begin{document}
An example of \uline{some long and underlined words.}
Some \emph{emphasized words,including \emph{double-emphasized}words}, are shown here.
\end{document}

7. 断行断页
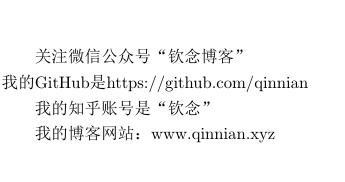
- 句尾添加
\\强制换行 - 句尾添加
\par强制换段(或者按两次Enter) - 句尾添加
\newpage强制换页
\documentclass[UTF8]{ctexart}
\begin{document}
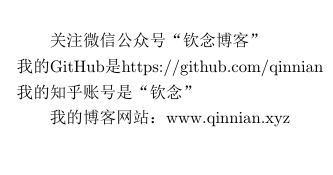
	关注微信公众号“钦念博客”\\我的GitHub是https://github.com/qinnian
	我的知乎账号是“钦念”\par
	我的博客网站:www.qinnian.xyz
\end{document}
- 段前添加
\noindent取消缩进(默认段⾸是缩进两格的)
\documentclass[UTF8]{ctexart}
\begin{document}
	\noindent
	我的知乎账号是“钦念”\par
\end{document}
