Android_layout

目录
- wrap_content 指示您的视图将其大小调整为内容所需的尺寸。
- match_parent 指示您的视图尽可能采用其父视图组所允许的最大尺寸。


1. 不同布局
.1. 约束布局 Constraint Layout
ConstraintLayout 使用约束的方式来指定各个控件的位置和关系的,它有点类似于 RelativeLayout,但远比 RelativeLayout 要更强大,它可以有效地解决布局嵌套过多的问题。
| 属性 | 说明 |
|---|---|
layout_constraintLeft_toLeftOf |
该控件的左边相对于某控件或父布局的左边对齐 |
layout_constraintLeft_toRightOf |
该控件的左边相对于某控件或父布局的右边对齐 |
layout_constraintRight_toLeftOf |
该控件的右边相对于某控件或父布局的左边对齐 |
layout_constraintRight_toRightOf |
该控件的右边相对于某控件或父布局的右边对齐 |
layout_constraintTop_toTopOf |
该控件的顶边相对于某控件或父布局的顶边对齐 |
layout_constraintTop_toBottomOf |
该控件的顶边相对于某控件或父布局的底边对齐 |
layout_constraintBottom_toTopOf |
该控件的底边相对于某控件或父布局的顶边对齐 |
layout_constraintBottom_toBottomOf |
该控件的底边相对于某控件或父布局的底边对齐 |
layout_constraintStart_toStartOf |
该控件的开始部分相对于某控件或父布局的开始部分对齐 |
layout_constraintStart_toEndOf |
该控件的开始部分相对于某控件或父布局的结束部分对齐 |
layout_constraintEnd_toStartOf |
该控件的结束部分相对于某控件或父布局的开始部分对齐 |
layout_constraintEnd_toEndOf |
该控件的结束部分相对于某控件或父布局的结束部分对齐 |
layout_constraintBaseline_toBaselineOf |
该控件的水平基准线相对于某控件或父布局的水平基准线对齐 |
1. 置顶,高自适应,宽 match_parent
<TextView
        android:id="@+id/tv_name"
        android:layout_width="0dp"
        android:layout_height="wrap_content"
        android:gravity="center"
        android:text="姓名"
        android:textSize="20sp"
        app:layout_constraintLeft_toLeftOf="parent"
        app:layout_constraintRight_toRightOf="parent"
        app:layout_constraintTop_toTopOf="parent"
    />
2. 一个控件在另一个空间下方
<TextView
        android:id="@+id/tv_mobile"
        android:layout_width="wrap_content"
        android:layout_height="20dp"
        android:text="手机号"
        android:gravity="center"
        app:layout_constraintLeft_toLeftOf="parent"
        app:layout_constraintRight_toRightOf="parent"
        app:layout_constraintTop_toBottomOf="@id/tv_name"
    />
3.控件上下左右居中显示
<TextView
        android:id="@+id/tv_age"
        android:layout_width="wrap_content"
        android:layout_height="wrap_content"
        android:text="年龄"
        android:gravity="center"
        android:textSize="30sp"
        app:layout_constraintHorizontal_weight="3"
        app:layout_constraintLeft_toLeftOf="parent"
        app:layout_constraintRight_toRightOf="parent"
        app:layout_constraintTop_toTopOf="parent"
        app:layout_constraintBottom_toBottomOf="parent"
    />
4. 百分比相对布局
<TextView
        android:id="@+id/tab0"
        android:layout_width="0dp"
        android:layout_height="50dp"
        android:background="@color/colorPrimary"
        android:gravity="center"
        android:text="tab1"
        android:textColor="@color/colorAccent"
        android:textSize="20sp"
        app:layout_constraintHorizontal_weight="2"
        app:layout_constraintBottom_toBottomOf="parent"
        app:layout_constraintLeft_toLeftOf="parent"
        app:layout_constraintRight_toLeftOf="@+id/tab1" />

    <TextView
        android:id="@+id/tab1"
        android:layout_width="0dp"
        android:layout_height="0dp"
        android:gravity="center"
        android:text="tab2"
        android:textSize="20sp"
        app:layout_constraintHorizontal_weight="1"
        app:layout_constraintBottom_toBottomOf="parent"
        app:layout_constraintLeft_toRightOf="@+id/tab0"
        app:layout_constraintRight_toLeftOf="@+id/tab2"
        app:layout_constraintTop_toTopOf="@+id/tab0" />

    <TextView
        android:id="@+id/tab2"
        android:layout_width="0dp"
        android:layout_height="0dp"
        android:background="@color/colorAccent"
        android:gravity="center"
        android:text="tab3"
        app:layout_constraintHorizontal_weight="1"
        android:textColor="@color/colorPrimary"
        android:textSize="20sp"
        app:layout_constraintBottom_toBottomOf="parent"
        app:layout_constraintLeft_toRightOf="@+id/tab1"
        app:layout_constraintRight_toLeftOf="@id/tab3"
        app:layout_constraintTop_toTopOf="@+id/tab0" />

    <TextView
        android:id="@+id/tab3"
        android:layout_width="0dp"
        android:layout_height="0dp"
        android:gravity="center"
        android:text="tab4"
        android:textSize="20sp"
        app:layout_constraintHorizontal_weight="3"
        app:layout_constraintBottom_toBottomOf="parent"
        app:layout_constraintLeft_toRightOf="@+id/tab2"
        app:layout_constraintRight_toLeftOf="@+id/tab4"
        app:layout_constraintTop_toTopOf="@+id/tab0" />

    <TextView
        app:layout_constraintHorizontal_weight="1"
        android:id="@+id/tab4"
        android:layout_width="0dp"
        android:layout_height="0dp"
        android:background="@color/colorAccent"
        android:gravity="center"
        android:text="tab5"
        android:textColor="@color/colorPrimary"
        android:textSize="20sp"
        app:layout_constraintBottom_toBottomOf="parent"
        app:layout_constraintLeft_toRightOf="@+id/tab3"
        app:layout_constraintRight_toRightOf="parent"
        app:layout_constraintTop_toTopOf="@+id/tab0" />

.2. 线性布局 LinearLayout
线性布局是按照水平或垂直的顺序将子元素(可以是控件或布局)依次按照顺序排列,每一个元素都位于前面一个元素之后。线性布局分为两种:水平方向和垂直方向的布局。分别通过属性 android:orientation=“vertical” 和 android:orientation=“horizontal” 来设置。 android:layout_weight 表示子元素占据的空间大小的比例。

<?xml version="1.0" encoding="utf-8"?>
<LinearLayout
    xmlns:android="http://schemas.android.com/apk/res/android"
    android:layout_width="match_parent"
    android:layout_height="match_parent"
    android:background="#FFFFFF"
    android:orientation="vertical">

    <LinearLayout
        android:layout_width="match_parent"
        android:layout_height="wrap_content"
        android:orientation="horizontal" >
        <EditText
            android:id="@+id/msg"
            android:inputType="number"
            android:layout_width="match_parent"
            android:layout_height="wrap_content"
            android:text="">
        </EditText>
    </LinearLayout>

    <-第二行为 mc m+ m- mr 四个Button构成一个水平布局-></-第二行为>
    <LinearLayout
        android:layout_width="match_parent"
        android:layout_height="wrap_content"
        android:orientation="horizontal" >
        <Button
            android:layout_width="match_parent"
            android:layout_height="wrap_content"
            android:text="mc" android:layout_weight="1">
        </Button>
        <Button
            android:layout_width="match_parent"
            android:layout_height="wrap_content"
            android:text="m+" android:layout_weight="1">
        </Button>
        <Button
            android:layout_width="match_parent"
            android:layout_height="wrap_content"
            android:text="m-" android:layout_weight="1">
        </Button>
        <Button
            android:layout_width="match_parent"
            android:layout_height="wrap_content"
            android:text="mr" android:layout_weight="1">
        </Button>
    </LinearLayout>
</LinearLayout>

.3. 相对布局 RelativeLayout
elativeLayout 继承于 android.widget.ViewGroup,其按照子元素之间的位置关系完成布局的,作为 Android 系统五大布局中最灵活也是最常用的一种布局方式,非常适合于一些比较复杂的界面设计。
- 相对于父控件属性
| 属性 | 说明 |
|---|---|
layout_alignParentBottom |
将控件底端与父控件的底端对齐 |
layout_alignParentLeft |
将控件左端与父控件的左端对齐 |
layout_alignParentRight |
将控件右端与父控件的右端对齐 |
layout_alignParentTop |
将控件上端与父控件的上端对齐 |
layout_alignParentStart |
将控件开始位置与父控件的开始位置对齐 |
layout_alignParentEnd |
将控件结束位置与父控件的结束位置对齐 |
layout_centerHorizontal |
将控件位于父控件的水平方向中间位置 |
layout_centerVertical |
将控件位于父控件的垂直方向中间位置 |
layout_centerInParent |
将控件位于父控件的水平和垂直方向中间位置 |
- 相对于指定控件属性
| 属性 | 说明 |
|---|---|
layout_above |
将控件位于指定id控件的上方 |
layout_below |
将控件位于指定id控件的下方 |
layout_toLeftOf |
将控件位于指定id控件的左边 |
layout_toRightOf |
将控件位于指定id控件的右边 |
layout_alignBottom |
将前控件与指定id控件的下边缘对齐 |
layout_alignLeft |
将控件与指定id控件的左边缘对齐 |
layout_alignRight |
将控件与指定id控件的右边缘对齐 |
layout_alignTop |
将控件与指定id控件的上边缘对齐 |
layout_alignStart |
将控件与指定id控件的开始位置对齐 |
layout_toStartOf |
将控件位于指定id控件的开始位置 |
layout_alignEnd |
将控件与指定id控件的结束位置对齐 |
layout_toEndOf |
将控件位于指定id控件的结束位置 |
layout_alignBaseline |
将控件的基线与指定id控件t的基线对齐 |

<?xml version="1.0" encoding="utf-8"?>
<RelativeLayout
    xmlns:android="http://schemas.android.com/apk/res/android"
    android:layout_width="match_parent"
    android:layout_height="match_parent">
    <Button
        android:id="@+id/btn1"
        android:layout_width="wrap_content"
        android:layout_height="wrap_content"
        android:layout_centerHorizontal="true"
        android:layout_centerInParent="true"
        android:text="Button1"
    />
    <Button
        android:id="@+id/btn2"
        android:layout_width="wrap_content"
        android:layout_height="wrap_content"
        android:layout_above="@id/btn1"
        android:layout_toLeftOf="@id/btn1"
        android:text="Button2"
    />
    <Button
        android:id="@+id/btn3"
        android:layout_width="wrap_content"
        android:layout_height="wrap_content"
        android:layout_above="@id/btn1"
        android:layout_toRightOf="@id/btn1"
        android:text="Button3"
    />
    <Button
        android:id="@+id/btn4"
        android:layout_width="wrap_content"
        android:layout_height="wrap_content"
        android:layout_above="@id/btn2"
        android:layout_toLeftOf="@id/btn3"
        android:layout_toRightOf="@id/btn2"
        android:text="Button4"
    />

</RelativeLayout>
.4. 表格布局TableLayout
stretchColumns为设置运行被拉伸的列的序号,如android:stretchColumns="2,3"表示在第三列的和第四列的一起填补空白,如果要所有列一起填补空白,则用“*”符号,列号都是从0开始算的。shrinkColumns为设置被收缩的列的序号,收缩是用于在一行中列太多或者某列的内容文本过长,会导致某列的内容会被挤出屏幕,这个属性是可以帮助某列的内容进行收缩,用于防止被挤出的。android:collapseColumns为设置需要被隐藏的列的序号,使用该属性可以隐藏某列。android:layout_column为为该子类控件显示在第几列。android:layout_column="2"表示跳过第二个,直接显示在第三个单元格内。android:layout_span为为该子类控件占据第几列。android:layout_span="3"表示合并3个单元格,就是这个组件将占据3个单元格。- 行数确定:如果我们直接往TableLayout中添加组件的话,那么这个组件将占满一行;
- 列数确定:如果我们想一行上有多个组件的话,就要添加一个TableRow的容器,把组件都丢到里面;
- tablerow中的组件个数就决定了该行有多少列,而列的宽度由该列中最宽的单元格决定; 一个tablerow一行,一个单独的组件也一行
- tablerow的layout_width属性,默认是fill_parent的,我们自己设置成其他的值也不会生效!!! 但是layout_height默认是wrapten——content的,我们却可以自己设置大小!
- 介绍: https://www.runoob.com/w3cnote/android-tutorial-tablelayout.html
<TableLayout
    android:id="@+id/TableLayout2"
    android:layout_width="fill_parent"
    android:layout_height="wrap_content"
    android:stretchColumns="1" >

    <TableRow>

        <Button
            android:layout_width="wrap_content"
            android:layout_height="wrap_content"
            android:text="one" />

        <Button
            android:layout_width="wrap_content"
            android:layout_height="wrap_content"
            android:text="two" />

        <Button
            android:layout_width="wrap_content"
            android:layout_height="wrap_content"
            android:text="three" />

        <Button
            android:layout_width="wrap_content"
            android:layout_height="wrap_content"
            android:text="four" />
    </TableRow>
</TableLayout>
.5. 帧布局FrameLayout
- 布局直接在屏幕上开辟出一块空白的区域,当我们往里面添加控件的时候,会默认把他们放到这块区域的左上角
- 帧布局的大小由控件中最大的子控件决定
<FrameLayout xmlns:android="http://schemas.android.com/apk/res/android"
    xmlns:tools="http://schemas.android.com/tools"
    android:id="@+id/FrameLayout1"
    android:layout_width="match_parent"
    android:layout_height="match_parent"
    tools:context=".MainActivity"
    android:foreground="@drawable/logo"
    android:foregroundGravity="right|bottom">

    <TextView
        android:layout_width="200dp"
        android:layout_height="200dp"
        android:background="#FF6143" />
    <TextView
        android:layout_width="150dp"
        android:layout_height="150dp"
        android:background="#7BFE00" />
     <TextView
        android:layout_width="100dp"
        android:layout_height="100dp"
        android:background="#FFFF00" />

</FrameLayout>

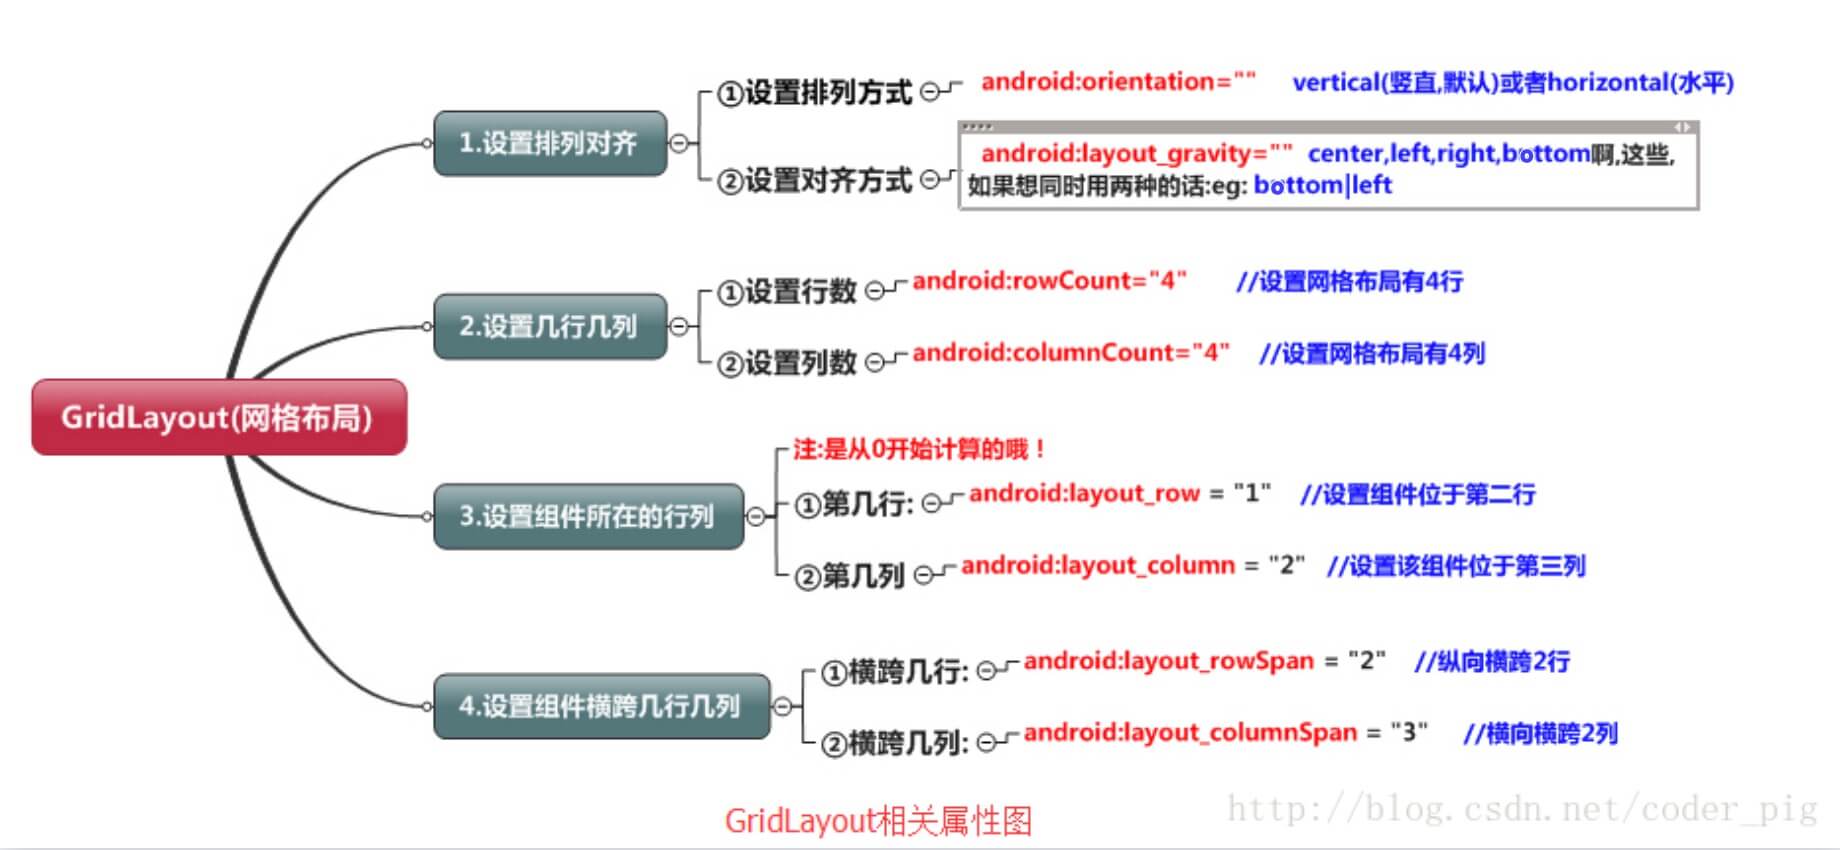
.6. 网格布局GridLayout
- 设置组件所在的行或者列,记得是从0开始算的,不设置默认每个组件占一行一列

<GridLayout xmlns:android="http://schemas.android.com/apk/res/android"
    xmlns:tools="http://schemas.android.com/tools"
    android:id="@+id/GridLayout1"
    android:layout_width="wrap_content"
    android:layout_height="wrap_content"
    android:columnCount="4"
    android:orientation="horizontal"
    android:rowCount="6" >
    <TextView
        android:layout_columnSpan="4"
        android:layout_gravity="fill"
        android:layout_marginLeft="5dp"
        android:layout_marginRight="5dp"
        android:background="#FFCCCC"
        android:text="0"
        android:textSize="50sp" />
    <Button
        android:layout_columnSpan="2"
        android:layout_gravity="fill"
        android:text="回退" />
    <Button
        android:layout_columnSpan="2"
        android:layout_gravity="fill"
        android:text="清空" />
    <Button android:text="+" />
    <Button android:text="1" />
    <Button android:text="2" />
    <Button android:text="3" />
    <Button android:text="-" />
    <Button android:text="4" />
    <Button android:text="5" />
    <Button android:text="6" />
    <Button android:text="*" />
    <Button android:text="7" />
    <Button android:text="8" />
    <Button android:text="9" />
    <Button android:text="/" />
    <Button
        android:layout_width="wrap_content"
        android:text="." />

    <Button android:text="0" />

    <Button android:text="=" />

</GridLayout>
2. 控件&布局属性
- 控件:TextView(文本框),EditText(输入框),Button,ImageButton,ImageView(图像视图),RadioButton,Checkbox,ToggleButton,ProgressBar,SeekBar,RatingBar,ScrollView, Data&Time
- https://www.runoob.com/w3cnote/android-tutorial-adapter.html
layout_width、layout_heightlayout_margin+方位padding+方位gravity, 一般作用于 LeanerLayout 和 FrameLayout


.1. 属性控制间距
可以通过hspace来控制,也可以通过相关属性来设置。
android:layout_marginTop="10dp"// 当前控件上边缘与其他控件(布局)的间距
android:layout_marginBottom="10dp" //当前控件下边缘与其他控件(布局)的间距
android:layout_marginLeft="10dp" //当前控件左边缘与其他控件(布局)的间距
android:layout_marginRight="10dp"//当前控件右边缘与其他控件(布局)的间距
.2. 相对布局demo
实现相对布局
<LinearLayout xmlns:android="http://schemas.android.com/apk/res/android"
    android:layout_width="match_parent"
    android:layout_height="wrap_content"
    android:gravity="center"
    android:orientation="horizontal"
    android:weightSum="2">
    <Button
        android:layout_width="wrap_content"
        android:layout_height="wrap_content"
        android:layout_weight="1"
        android:text="按钮" />
</LinearLayout>
<?xml version="1.0" encoding="utf-8"?>
<LinearLayout xmlns:android="http://schemas.android.com/apk/res/android"
    android:layout_width="fill_parent"
    android:layout_height="match_parent"
    android:background="#ff00ff"
    android:orientation="vertical">

    <RelativeLayout
        android:layout_weight="1"
        android:background="#ffff00"
        android:layout_width="fill_parent"
        android:layout_height="wrap_content">
        <TextView
            android:id="@+id/textView0"
            android:layout_width="fill_parent"
            android:layout_height="wrap_content"
            android:gravity="center_horizontal"
            android:text="Hello 1"
            android:textColor="#000000"
            android:textSize="15dp" />
    </RelativeLayout>

    <RelativeLayout
        android:layout_weight="2"
        android:background="#00ffff"
        android:layout_width="fill_parent"
        android:layout_height="wrap_content">
        <TextView
            android:id="@+id/textView1"
            android:layout_width="fill_parent"
            android:layout_height="wrap_content"
            android:gravity="center_horizontal"
            android:text="Hello 2"
            android:textColor="#000000"
            android:textSize="15dp" />
    </RelativeLayout>

    <RelativeLayout
        android:layout_weight="1"
        android:background="#ffff00"
        android:layout_width="fill_parent"
        android:layout_height="wrap_content">
        <TextView
            android:id="@+id/textView2"
            android:layout_width="fill_parent"
            android:layout_height="wrap_content"
            android:gravity="center_horizontal"
            android:text="Hello 3"
            android:textColor="#000000"
            android:textSize="15dp" />
    </RelativeLayout>
</LinearLayout>
3. 选择器
| XML属性 | 说明 |
|---|---|
| android:drawable | 放一个drawable资源 |
| android:state_pressed | 按下状态,如一个按钮触摸或者点击。 |
| android:state_focused | 取得焦点状态,比如用户选择了一个文本框。 |
| android:state_hovered | 光标悬停状态,通常与focused state相同,它是4.0的新特性 |
| android:state_selected | 选中状态 |
| android:state_enabled | 能够接受触摸或者点击事件 |
| android:state_checked | 被checked了,如:一个RadioButton可以被check了。 |
| android:state_enabled | 能够接受触摸或者点击事件 |
.1. 示例demo
- button_selector.xml:
<?xml version="1.0" encoding="UTF-8"?>
< selector xmlns:android="http://schemas.android.com/apk/res/android">
 < !-- 指定按钮按下时的图片 -->
 <item android:state_pressed="true"
       android:drawable="@drawable/start_down"
 />
 < !-- 指定按钮松开时的图片 -->
 <item android:state_pressed="false"
       android:drawable="@drawable/start"
 />
< /selector>
- main.xml
<Button
  android:id="@+id/startButton"
  android:layout_width="wrap_content"
  android:layout_height="wrap_content"
  android:background="@drawable/button_selector"
/>
4. 自定义布局
.1. 使用FrameLayout
<FrameLayout xmlns:android="http://schemas.android.com/apk/res/android"
    xmlns:tools="http://schemas.android.com/tools"
    android:id="@+id/mylayout"
    android:layout_width="match_parent"
    android:layout_height="match_parent"
    tools:context=".MainActivity"
    android:background="@drawable/back" >
</FrameLayout>
public class MeziView extends View {
    //定义相关变量,依次是妹子显示位置的X,Y坐标
    public float bitmapX;
    public float bitmapY;
    public MeziView(Context context) {
        super(context);
        //设置妹子的起始坐标
        bitmapX = 0;
        bitmapY = 200;
    }

    //重写View类的onDraw()方法
    @Override
    protected void onDraw(Canvas canvas) {
        super.onDraw(canvas);
        //创建,并且实例化Paint的对象
        Paint paint = new Paint();
        //根据图片生成位图对象
        Bitmap bitmap = BitmapFactory.decodeResource(this.getResources(), R.drawable.s_jump);
        //绘制萌妹子
        canvas.drawBitmap(bitmap, bitmapX, bitmapY,paint);
        //判断图片是否回收,木有回收的话强制收回图片
        if(bitmap.isRecycled())
        {
            bitmap.recycle();
        }
    }
}
package com.jay.example.framelayoutdemo2;

import android.os.Bundle;
import android.view.MotionEvent;
import android.view.View;
import android.view.View.OnTouchListener;
import android.widget.FrameLayout;
import android.app.Activity;


public class MainActivity extends Activity {

    @Override
    protected void onCreate(Bundle savedInstanceState) {
        super.onCreate(savedInstanceState);
        setContentView(R.layout.activity_main);
        FrameLayout frame = (FrameLayout) findViewById(R.id.mylayout);
        final MeziView mezi = new MeziView(MainActivity.this);
        //为我们的萌妹子添加触摸事件监听器
        mezi.setOnTouchListener(new OnTouchListener() {
            @Override
            public boolean onTouch(View view, MotionEvent event) {
                //设置妹子显示的位置
                mezi.bitmapX = event.getX() - 150;
                mezi.bitmapY = event.getY() - 150;
                //调用重绘方法
                mezi.invalidate();
                return true;
            }
        });
        frame.addView(mezi);
    }
}
4. 问题记录
.1. android ImageView 不显示图片
1、activity 继承 AppCompatActivity 时:public class myClass extends AppCompatActivity{} layout中添加ImageView使用:app:srcCompat="@drawable/xxx" 2、activity 继承 Activity时,如下:public class myClass extends Activity{} layout中添加ImageView使用:android:src=="@drawable/xxx"