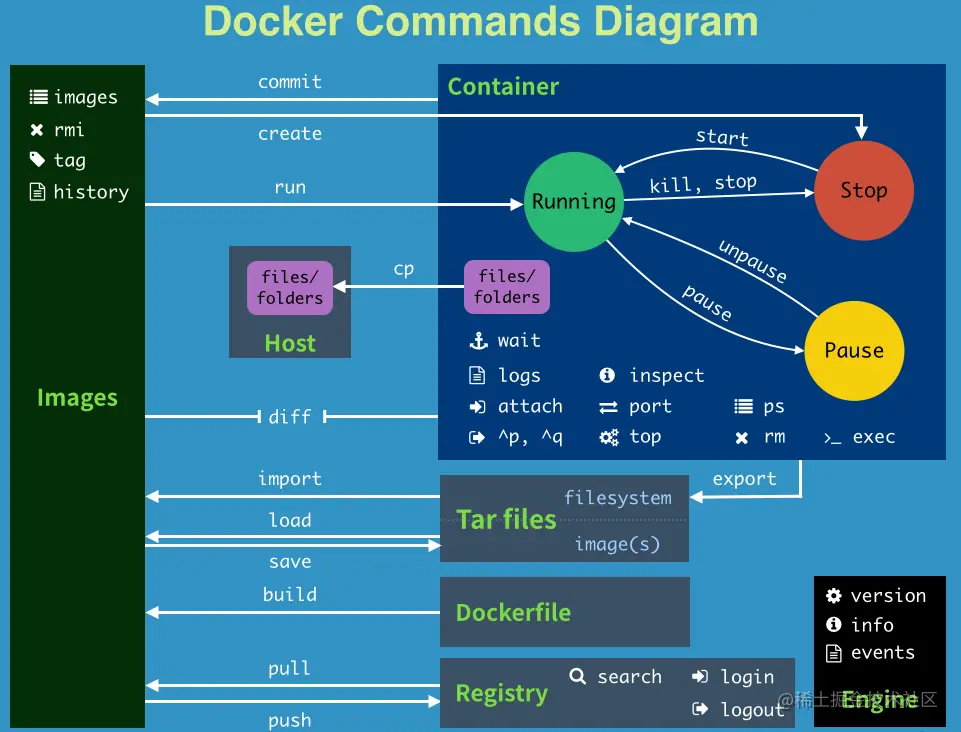
Docker-Command

目录
1. 帮助命令
docker version    # 显示docker的版本信息
docker info       #  显示docker的系统信息,包括镜像和容器的数量
docker --help     #  帮助命令
2. 镜像相关
#检索image, 会在dockerhub 检索,  –filter=STARS=100 # 搜索出来的镜像 收藏数量大于 100
$docker search image_name

#下载image
$docker pull image_name

#列出镜像列表; -a, --all=false Show all images; --no-trunc=false Don't truncate output; -q, --quiet=false Only show numeric IDs
$docker images

#删除一个或者多个镜像; -f, --force=false Force; --no-prune=false Do not delete untagged parents
$docker rmi image_name

#显示一个镜像的历史; --no-trunc=false Don't truncate output; -q, --quiet=false Only show numeric IDs
$ docker history image_name
3. 启动镜像
docker run 是利用镜像生成容器,并启动新容器,而 docker start 是启动一个之前生成过的容器
#在容器中运行"echo"命令,输出"hello word"
$ docker run image_name echo "hello word"

#交互式进入容器中
$ docker run -i -t image_name /bin/bash

# 进入当前正在运行的容器
docker exec -it 容器ID /bin/bash

#在容器中安装新的程序
$ docker run image_name apt-get install -y app_name

# -d 后台运行
# --name 给容器命名
# -p 主机端口:容器内部端口
docker run -d --name nginx01 -p 1314:80 nginx
#-d 后台运行
#-p 端口映射
#-v 卷挂载 多个对应多个-v
#-e 环境配置
#--name 容器名字
docker run -d -p 33061:3306 -v D:\docker\mnt\mysql\conf:/etc/conf.d -v D:\docker\mnt\mysql\data:/var/lib/mysql -e MYSQL_ROOT_PASSWORD=123456 --name mysql01 mysql:5.7

# docker create 命令会在指定的镜像上创建可写的容器
$ docker create -it --name centos.7 image_name
$ docker run -it --name centos.7.1 centos:7
#该命令会在镜像 centos:7 上创建并运行容器 centos.7.1,如果 Docker 已经拉取过 centos:7 镜像,则该命令会直接创建一个基于镜像 centos:7 的容器 centos.7.1,否则会先去仓库拉取该 centos:7 镜像,如果没有指定版本,默认拉取:latest 最新版,拉取成功后再运行该拉取的 centos:7 镜像,生成一个容器 centos.7.1,最后再运行该容器。
.1. run 参数介绍
--rm 选项,这样在容器退出时就能够自动清理容器内部的文件系统;-d: 后台运行容器,并返回容器 ID;-i: 以交互模式运行容器,通常与 -t 同时使用;-P: 随机端口映射,容器内部端口随机映射到主机的端口-p: 指定端口映射,格式为:主机 (宿主) 端口: 容器端口-t: 为容器重新分配一个伪输入终端,通常与 -i 同时使用--name="nginx-lb": 为容器指定一个名称;- –dns 8.8.8.8: 指定容器使用的 DNS 服务器,默认和宿主一致;
- –dns-search example.com: 指定容器 DNS 搜索域名,默认和宿主一致;
- -h “mars”: 指定容器的 hostname;
- -e username=“ritchie”: 设置环境变量;
--env-file=[]: 从指定文件读入环境变量;- –cpuset=“0-2” or –cpuset=“0,1,2”: 绑定容器到指定 CPU 运行;
- -m : 设置容器使用内存最大值;
- –net=“bridge”: 指定容器的网络连接类型,支持 bridge/host/none/container: 四种类型;
- –link=[]: 添加链接到另一个容器;
--expose=[]: 开放一个端口或一组端口;- –restart , 指定重启策略,可以写 –restart=awlays 总是故障重启
--volume , -v: 绑定一个卷。一般格式 主机文件或文件夹: 虚拟机文件或文件夹
4. 容器操作
.1. 容器查看
# 列出当前所有正在运行的container
$docker ps
# 列出所有的container
$docker ps -a
# 列出最近一次启动的container
$docker ps -l

#保存对容器的修改; -a, --author="" Author; -m, --message="" Commit message
$docker commit dockercontainerID new_image_name
.2. 容器操作
# 删除所有容器
$ docker rm `docker ps -a -q`

# 删除单个容器; -f, --force=false; -l, --link=false Remove the specified link and not the underlying container; -v, --volumes=false Remove the volumes associated to the container
$ docker rm Name/ID    #不能删除正在运行的容器, -f: 可以强制删除

#停止、启动、杀死一个容器
$ docker stop Name/ID    # 需要先创建好的容器
$ docker start Name/ID
$ docker kill Name/ID

#从一个容器中取日志; -f, --follow=false Follow log output; -t, --timestamps=false Show timestamps
$ docker logs Name/ID

#列出一个容器里面被改变的文件或者目录,list列表会显示出三种事件,A 增加的,D 删除的,C 被改变的
$ docker diff Name/ID

#显示一个运行的容器里面的进程信息
$ docker top Name/ID

#从容器里面拷贝文件/目录到本地一个路径
# docker cp Name:/container_path to_path
$ docker cp 53359cb5303a:/home/test.py d:/
#将本地文件复制到 docker 容器中
$ docker cp 本地文件路径 容器ID/容器NAME:容器内路径

#重启一个正在运行的容器; -t, --time=10 Number of seconds to try to stop for before killing the container, Default=10
$docker restart Name/ID

#附加到一个运行的容器上面; --no-stdin=false Do not attach stdin; --sig-proxy=true Proxify all received signal to the process
$docker attach containerID   #进入容器内部
.3. 查看日志
# docker logs -f -t --tail 最后条数 容器ID
$ docker logs -f -t --tail 100 5bf2312ac02f  # 显示最后100条日志
$ docker logs -tf  # 显示全部日志
5. 保存加载镜像
#保存镜像到一个tar包; -o, --output="" Write to an file
$docker save image_name -o file_path
#加载一个tar包格式的镜像; -i, --input="" Read from a tar archive file
$docker load -i file_path

# 通过scp远程传输打包镜像文件
$docker save image_name > /home/save.tar
#使用scp将save.tar拷到机器b上,然后:
$docker load < /home/save.tar
6. 登录registry server
#登陆registry server; -e, --email="" Email; -p, --password="" Password; -u, --username="" Username
$docker login
7. dockerfile构建容器
###build
#      --no-cache=false Do not use cache when building the image
#      -q, --quiet=false Suppress the verbose output generated by the containers
#      --rm=true Remove intermediate containers after a successful build
#      -t, --tag="" Repository name (and optionally a tag) to be applied to the resulting image in case of success
$docker build -t image_name Dockerfile_path

#发布docker镜像
$docker push new_image_name
.1. build 参数介绍
--build-arg=[] : 设置镜像创建时的变量;

--cpu-shares : 设置 cpu 使用权重;

--cpu-period : 限制 CPU CFS 周期;

--cpu-quota : 限制 CPU CFS 配额;

--cpuset-cpus : 指定使用的 CPU id;

--cpuset-mems : 指定使用的内存 id;

--disable-content-trust : 忽略校验,默认开启;

-f : 指定要使用的 Dockerfile 路径;

--force-rm : 设置镜像过程中删除中间容器;

--isolation : 使用容器隔离技术;

--label=[] : 设置镜像使用的元数据;

-m : 设置内存最大值;

--memory-swap : 设置 Swap 的最大值为内存 + swap,"-1" 表示不限 swap;

--no-cache : 创建镜像的过程不使用缓存;

--pull : 尝试去更新镜像的新版本;

--quiet, -q : 安静模式,成功后只输出镜像 ID;

--rm : 设置镜像成功后删除中间容器;

--shm-size : 设置 /dev/shm 的大小,默认值是 64M;

--ulimit :Ulimit 配置。

--squash : 将 Dockerfile 中所有的操作压缩为一层。

--tag, -t: 镜像的名字及标签,通常 name:tag 或者 name 格式;可以在一次构建中为一个镜像设置多个标签。

--network: 默认 default。在构建期间设置 RUN 指令的网络模式
8. 网络操作
$ docker network ls
NETWORK ID     NAME      DRIVER    SCOPE
075fff009f22   bridge    bridge    local
efbaf94573b8   host      host      local
29125732f2e0   none      null      local

# 查看网络具体信息
$ docker network inspect 075fff009f22
